Practical Kotlin Deep Dive
Note: This is a preview of Practical Kotlin Deep Dive, featuring a curated selection of topics from the book. To explore the full content, please visit the main page. You can directly read the full content on Leanpub and Gumroad.
Welcome to Practical Kotlin Deep Dive. This book is designed for Kotlin developers who want to deep dive into the Kotlin fundamentals, internal mechanisms, and leverage that knowledge in their daily work right away.
Each topic provides in-depth explanations that go beyond surface-level knowledge, exploring not just how Kotlin features work but why they were designed that way. You'll find references to KEEP (Kotlin Evolution and Enhancement Process) proposals, JetBrains YouTrack discussions, and compiler source code, giving you direct insight into the design decisions behind the language.
This book includes relevant resources and additional references for those seeking further study beyond its content. Efforts have been made to provide footnotes for key terms that may be unfamiliar or complex, ensuring that developers at all levels can grasp challenging concepts while deepening their understanding.
The "Pro Tips for Mastery" sections dive deeper into advanced topics, uncovering internal structures of the Kotlin fundamentals, and offering expert insights that you can apply immediately to write better code. These sections bridge the gap between knowing a feature exists and truly understanding how to use it effectively.
This book covers Language Fundamentals, Standard Library, Coroutines, Compiler and Plugins, and Kotlin Multiplatform in a structured progression. However, it is not intended to be an exhaustive reference for every aspect of Kotlin. Instead, it focuses on practical knowledge that makes a real difference in how you write, debug, and optimize Kotlin code.
Best of luck on your journey to mastering Kotlin!
Preview Topics
This preview covers selected topics from the full book:
- Data Classes: Understanding what data classes are, how they differ from regular classes, and exploring their bytecode implementation.
- Delegated Properties: Learning how property delegation works and its practical applications.
- Functional (SAM) Interfaces: Exploring functional interfaces and their role in Kotlin's interoperability with Java.
- Coroutines & Jobs: Understanding the role of Jobs in structured concurrency and coroutine lifecycle management.
- StateFlow & SharedFlow: Comparing these two Flow types and understanding when to use each.
- K2 Compiler: Exploring Kotlin's next-generation compiler architecture and its improvements.
Q) 2. What is a data class, and how does it differ from a regular class?
A data class is a special type of class specifically designed to hold data. It's a concise way to create a class that serves as a data container, and the Kotlin compiler automatically generates useful, standard functionality for it that you would otherwise have to write manually for a regular class.
Key Characteristics
A data class must fulfill certain requirements:
- The primary constructor needs to have at least one parameter.
- All primary constructor parameters must be marked as either
valorvar. - Data classes cannot be
abstract,open,sealed, orinner.
Key Features of Data Classes
When you declare a data class, Kotlin compiler automatically generates the following:
equals(): The generatedequals()checks for structural equality. It returnstrueif two instances have the same values for all their properties defined in the primary constructor. This is usually what you want when comparing data objects.hashCode(): The generatedhashCode()is calculated based on the hash codes of all its primary constructor properties. This ensures that two structurally equal data class instances will also have the same hash code, which is a critical contract for using objects correctly in collections likeHashSetor as keys in aHashMap.toString(): The generatedtoString()provides a clean, readable representation of the object's state, listing the class name and the name-value pairs of its properties (e.g.,User(name=Alice, age=30)). This is extremely useful for logging and debugging.copy(): The compiler generates acopy()function. This function allows you to create a new instance of the class by copying an existing one, with the option to change some of its properties while keeping the others the same. This is fundamental for working with immutable objects, as it provides an easy way to create a new state from a previous state.- Component functions: The compiler generates
component1(),component2(), etc., for each property in the primary constructor, in the order they are declared. These functions are what enable destructuring declarations, a useful feature that allows you to unpack an object into individual variables.
For example, imagine a data class representing a user, containing name and age information, as shown in the code below:
class NormalUser(val name: String, val age: Int)

data class DataUser(val name: String, val age: Int)

fun main() {
    val normalUser1 = NormalUser("Alice", 30)
    val normalUser2 = NormalUser("Alice", 30)

    val dataUser1 = DataUser("Alice", 30)
    val dataUser2 = DataUser("Alice", 30)

    // 1. equals()
    println(normalUser1 == normalUser2) // Prints: false (different objects in memory)
    println(dataUser1 == dataUser2)     // Prints: true (same property values)

    // 2. toString()
    println(normalUser1) // Prints something like: NormalUser@1f32e575
    println(dataUser1)   // Prints: DataUser(name=Alice, age=30)

    // 3. Destructuring with componentN()
    val (name, age) = dataUser1
    println("Name: $name, Age: $age") // Prints: Name: Alice, Age: 30
    // val (name2, age2) = normalUser1 // This would cause a compile error

    // 4. copy()
    val dataUser3 = dataUser1.copy(age = 31)
    println(dataUser3) // Prints: DataUser(name=Alice, age=31)
    // val normalUser3 = normalUser1.copy() // This would cause a compile error
}
In the example above, Kotlin automatically provides equals(), hashCode(), toString(), and copy() for the User class.
Differences Between Data Class and Regular Class
In addition to the auto-generated functions, there are several key differences between a data class and a regular class.
-
Boilerplate Reduction: In a regular class, you would need to manually override
equals(),hashCode(),toString(), and other utility methods. With a data class, Kotlin generates these for you automatically. -
Primary Constructor Requirement: A data class requires at least one property to be declared in the primary constructor, whereas a regular class does not.
-
Use Case: Data classes are typically used for holding read-only domain data (though you can use mutable properties) from the I/O processes, such as database and network, whereas regular classes can be used for any kind of behavior or logic.
Summary
Data classes are used for objects that only contain data, and Kotlin compiler automatically generates utility methods like equals(), hashCode(), toString(), and copy(). On the other hand, a regular class is more flexible but doesn't provide those methods by default, making it more suited for objects with behavior and complex logic.
💡 Pro Tips for Mastery: Data class inheritance
The KEEP proposal on data class inheritance explores the possibility of allowing data classes to inherit from other classes. It proposes modifications to support inheritance while retaining key data class features such as equals(), hashCode(), and copy(), ensuring compatibility with the existing Kotlin philosophy. The proposal includes guidelines for overriding component functions and discusses challenges like managing constructor parameters and handling inherited properties effectively.
💡 Pro Tips for Mastery: The visibility of the copy function of data classes
Currently, when you create a data class with a private constructor, the automatically generated copy() function does not inherit the same visibility, which can lead to unexpected issues in your code. In future Kotlin releases, the default visibility of the copy() function will align with the visibility of the constructor, ensuring consistency. This change will be introduced gradually to minimize disruption and allow for a smooth migration.
Starting with Kotlin 2.0.20, the compiler will issue warnings in areas of your code where this visibility change might affect behavior, giving you ample time to adapt before the update is fully enforced. For example:
// Triggers a warning in 2.0.20
data class PositiveInteger private constructor(val number: Int) {
    companion object {
        fun create(number: Int): PositiveInteger? = if (number > 0) PositiveInteger(number) else null
    }
}

fun main() {
    val positiveNumber = PositiveInteger.create(42) ?: return
    // Triggers a warning in 2.0.20
    val negativeNumber = positiveNumber.copy(number = -1)
    // Warning: Non-public primary constructor is exposed via the generated 'copy()' method of the 'data' class.
    // The generated 'copy()' will change its visibility in future releases.
}
For the latest details about our migration plan, refer to the corresponding issue in YouTrack.
To manage the transition, Kotlin provides the following annotations:
@ConsistentCopyVisibility: Allows you to opt into the new behavior before it becomes the default in a future release.@ExposedCopyVisibility: Lets you opt out of the new behavior and suppress warnings at the declaration site. However, even with this annotation, the compiler will still issue warnings when thecopy()function is called.
If you'd like to enable the new behavior for an entire module in Kotlin 2.0.20, you can use the -Xconsistent-data-class-copy-visibility compiler option. This option applies the same effect as adding the @ConsistentCopyVisibility annotation to all data classes within the module.
💡 Pro Tips for Mastery: Unveiling a data class in Java Bytecode
Most developers coming to Kotlin from Java find it modern and amazing, a language that seems to handle everything automatically. But if you look at the compiled Java bytecode, its true nature is revealed.
Let's say there's a simple User class.
data class User(val name: String, val age: Int)
In just one line, we have defined a class with two immutable properties. Now, let's see what the Kotlin compiler creates from this.
import kotlin.jvm.internal.Intrinsics;
import org.jetbrains.annotations.NotNull;
import org.jetbrains.annotations.Nullable;

// The data class becomes a final Java class.
public final class User {
    @NotNull
    private final String name;
    private final int age;

    // 1. Standard constructor and getters.
    public User(@NotNull String name, int age) {
        Intrinsics.checkNotNullParameter(name, "name");
        this.name = name;
        this.age = age;
    }

    @NotNull
    public final String getName() {
        return this.name;
    }

    public final int getAge() {
        return this.age;
    }

    // 2. The componentN() methods for destructuring.
    @NotNull
    public final String component1() {
        return this.name;
    }

    public final int component2() {
        return this.age;
    }

    // 3. The copy() method for immutable updates.
    @NotNull
    public final User copy(@NotNull String name, int age) {
        Intrinsics.checkNotNullParameter(name, "name");
        return new User(name, age);
    }

    // A synthetic overload for the copy method to allow default parameters.
    public static /* synthetic */ User copy$default(User self, String name, int age, int mask, Object obj) {
        if ((mask & 1) != 0) {
            name = self.name;
        }
        if ((mask & 2) != 0) {
            age = self.age;
        }
        return self.copy(name, age);
    }

    // 4. A readable and useful toString() method.
    @NotNull
    public String toString() {
        return "User(name=" + this.name + ", age=" + this.age + ")";
    }

    // 5. A content-based hashCode() method.
    public int hashCode() {
        return this.name.hashCode() * 31 + this.age;
    }

    // 6. A structural equals() method.
    public boolean equals(@Nullable Object other) {
        if (this == other) {
            return true;
        }
        if (!(other instanceof User)) {
            return false;
        }
        User otherUser = (User) other;
        if (!Intrinsics.areEqual(this.name, otherUser.name)) {
            return false;
        }
        if (this.age != otherUser.age) {
            return false;
        }
        return true;
    }
}
The decompiled code reveals that the data keyword is an instruction to the compiler to automatically generate the following (a ton of) methods:
-
Standard Constructor and Getters: A public constructor is created with parameters matching the primary constructor. For each
valproperty, afinalfield and a public getter method are generated. -
componentN()Methods: For each property in the primary constructor, a correspondingcomponentN()method is generated (e.g.,component1()forname,component2()forage). These operator functions are the magic behind destructuring declarations in Kotlin, allowing you to writeval (name, age) = user. -
copy()Method: Acopy()method is generated, which allows you to create a new instance of the class while optionally changing some of the properties. This is fundamental to working with immutable data structures, as it provides a concise way to produce a new state from an old one. The compiler also generates a syntheticcopy$defaultmethod to handle the default parameter logic (i.e., copying existing values if a new one isn't provided). -
toString()Method: A readabletoString()implementation is generated. Instead of the defaultClassName@memoryAddress, it produces a clean string likeUser(name=Alice, age=30), which is invaluable for logging and debugging. -
hashCode()Method: A properhashCode()is generated based on the content of the primary constructor properties. This is pretty important. It ensures that twoUserinstances with the samenameandagewill produce the same hash code, which is a required contract for objects used in hash-based collections likeHashSetor as keys in aHashMap. -
equals()Method: A structuralequals()method is generated. It checks if the other object is of the same type and then compares each primary constructor property for equality. This meansUser("Alice", 30) == User("Alice", 30)will correctly evaluate totrue, which is the intuitive behavior for data-holding classes. A normal class would check for referential equality and returnfalse.
It feels like some of this was already explained in the previous question, right? That's because all of those functions are generated at compile time into Java Bytecode, and that's exactly why a data class offers so many convenient features. These generated functions are important, so make sure to keep them in mind. A data class isn't magic; it's just the Kotlin compiler doing the "work".
Conclusion
Decompiling a Kotlin data class provides the clearest possible illustration of its value. The simple "data" keyword is an instruction to the compiler to generate a suite of well-behaved, essential methods that are required for any robust data-holding class. By auto-generating equals(), hashCode(), toString(), copy(), and componentN() functions, the compiler saves developers from writing a significant amount of repetitive and error-prone boilerplate code.
📚 Enjoying the preview? This is just a glimpse of what's inside. Get the complete book with all chapters and deep dives into Kotlin internals.
Q) 11. What's a delegated property?
The delegated properties allow the delegation of property access to another object, which can handle the getter and setter logic. This is done using the by keyword, which connects the property to a delegate that defines how the property will be stored and retrieved.
How Delegated Properties Work
A delegated property delegates its getter and setter to another object, known as the delegate. The delegate manages the property's value and provides custom logic for accessing or modifying it.
Common Use Cases for Delegated Properties
- Lazy Initialization (
lazy) Thelazydelegate allows for initializing a property only when it's first accessed, avoiding the need to initialize it at object creation. In the code below,"Computed!"is printed, and the value"Hello, Kotlin!"is assigned only whenlazyValueis accessed for the first time.
   val lazyValue: String by lazy {
       println("Computed!")
       "Hello, Kotlin!"
   }
- Observable Properties (
Delegates.observable) This delegate allows monitoring property changes by triggering a callback when the value changes. In the example below,"Value changed from Initial value to New value"is printed wheneverobservableValuechanges:
   import kotlin.properties.Delegates

   var observableValue: String by Delegates.observable("Initial value") { _, old, new ->
       println("Value changed from $old to $new")
   }
   observableValue = "New value"
- Vetoable Properties (
Delegates.vetoable) Thevetoabledelegate is similar toobservablebut allows vetoing changes based on a condition. In the example below, the new value is accepted only if it is greater than the old value:
   var vetoableValue: Int by Delegates.vetoable(0) { _, old, new ->
       new > old  // Accept the new value only if it's greater than the old value
   }
   vetoableValue = 5  // Allowed
   vetoableValue = 2  // Not allowed, vetoed
- Storing Properties in a Map (
Map Delegate) This approach is useful for dynamic properties where property names and values are stored in a map. In the example below, property values are retrieved from a map:
   class User(val map: Map<String, Any?>) {
       val name: String by map
       val age: Int by map
   }

   val user = User(mapOf("name" to "John Doe", "age" to 30))
   println(user.name)  // Output: John Doe
   println(user.age)   // Output: 30
Local delegated properties
The KEEP proposal for Local delegated properties introduces local delegated properties, enabling the use of delegation for properties declared within functions or blocks. This feature enhances reusability and encapsulation by allowing local variables to delegate their behavior to custom delegates. It provides consistency with global and class-level delegation, improving code clarity and flexibility in local scopes.
Enable the use of delegates for local variables, similar to how they are utilized in general delegated properties.
import kotlin.reflect.KProperty

class Delegate {
    operator fun getValue(t: Any?, p: KProperty<*>): Int = 1
}

fun box(): String {
    val prop: Int by Delegate()
    return if (prop == 1) "OK" else "fail"
}
Summary
Delegated properties provide a way to delegate property access to other objects for specific behavior, such as lazy initialization, change observation, vetoing changes, or mapping property values. This makes the code more concise and modular, allowing developers to separate property management logic from other code.
💡 Pro Tips for Mastery: Internal mechanisms of Lazy
Kotlin provides a very useful delegate: lazy. The lazy function creates a property whose value is computed only on its first access and then cached for all subsequent calls. While the public API is super simple, a deep dive into its internals reveals a well-architected system built on the Lazy interface, with multiple, specialized implementations designed to handle different thread-safety requirements.
The entire lazy mechanism is built around a simple but creative interface. This interface defines the public contract for any object that represents a lazily initialized value.
public interface Lazy<out T> {
    /**
     * Gets the lazily initialized value of the current Lazy instance.
     * Once the value was initialized it must not change during the rest of lifetime of this Lazy instance.
     */
    public val value: T

    /**
     * Returns true if a value for this Lazy instance has been already initialized, and false otherwise.
     * Once this function has returned true it stays true for the rest of lifetime of this Lazy instance.
     */
    public fun isInitialized(): Boolean
}
value: T: This read-only property is the main entry point. The first time it's accessed, it will trigger the execution of the initializer lambda. On all subsequent accesses, it will return the cached result.isInitialized(): Boolean: This function allows a developer to check if the initializer has already run without actually triggering it.
This interface is what enables property delegation. The getValue operator extension function operator fun <T> Lazy<T>.getValue(...) simply delegates the property read to the lazy.value property, as shown below:
/**
 * An extension to delegate a read-only property of type [T] to an instance of [Lazy].
 *
 * This extension allows to use instances of Lazy for property delegation:
 * val property: String by lazy { initializer }
 */
@kotlin.internal.InlineOnly
public inline operator fun <T> Lazy<T>.getValue(thisRef: Any?, property: KProperty<*>): T = value
The Internal State Management: UNINITIALIZED_VALUE
All non-trivial Lazy implementations share a common internal strategy for tracking their state. They use a special singleton object, UNINITIALIZED_VALUE, as an internal marker. A private _value field is initialized with this marker. When value is accessed, the implementation checks if _value is still === UNINITIALIZED_VALUE. If it is, the initializer is run. If not, the cached value is returned.
After the initializer runs, two things happen:
- The
_valuefield is updated with the computed result. - The reference to the initializer lambda is set to
nullto allow it to be garbage collected, preventing memory leaks.
The lazy function is a factory that, based on the requested LazyThreadSafetyMode, returns one of three distinct internal implementations. This is where the core logic resides.
1. LazyThreadSafetyMode.NONE -> UnsafeLazyImpl
This is the simplest, fastest, and least safe implementation.
// Simplified for clarity
override val value: T
    get() {
        if (_value === UNINITIALIZED_VALUE) {
            _value = initializer!!()
            initializer = null
        }
        return _value as T
    }
- Mechanism: It performs a simple, non-synchronized check. The first time
valueis accessed, it runs the initializer and stores the result. - Use Case: This implementation provides absolutely no thread safety. If two threads access an uninitialized
UnsafeLazyImplinstance at the same time, it's possible for the initializer to be called twice. Its behavior is unspecified in a multi-threaded context. It should only be used when you can guarantee that the lazy property will be initialized and accessed from a single thread. It offers the best performance due to the lack of any synchronization overhead.
2. LazyThreadSafetyMode.SYNCHRONIZED -> SynchronizedLazyImpl (The Default)
This is the default and most robust implementation, guaranteeing that the initializer is executed exactly once, even in a highly concurrent environment.
// Simplified for clarity
override val value: T
    get() {
        if (_value !== UNINITIALIZED_VALUE) {
            return _value as T
        }

        return synchronized(lock) {
            if (_value !== UNINITIALIZED_VALUE) {
                _value as T
            } else {
                val typedValue = initializer!!()
                _value = typedValue
                initializer = null
                typedValue
            }
        }
    }
- Mechanism: It uses the classic double-checked locking pattern.
- First Check (No Lock): It first checks
_valueoutside of any synchronized block. If the value is already initialized, it's returned immediately without incurring the cost of acquiring a lock. This makes subsequent accesses after the first one very fast. - Second Check (With Lock): If the value is not initialized, it enters a
synchronized(lock)block. Inside the lock, it checks_valueagain. This second check is crucial. It handles the race condition where another thread might have acquired the lock and initialized the value in the time between the first check and this thread acquiring the lock. - Initialization: Only if the value is still uninitialized does this thread execute the initializer lambda and store the result.
- First Check (No Lock): It first checks
- Use Case: This is the default mode and the safest choice for any property that could be accessed by multiple threads. It guarantees both atomicity of initialization and visibility of the result across all threads (due to the memory guarantees of
synchronizedand thevolatileannotation on_value).
3. LazyThreadSafetyMode.PUBLICATION -> SafePublicationLazyImpl
This implementation offers a more relaxed form of thread safety. It also guarantees that only one final value will be used, but it allows the initializer lambda to be called multiple times.
// Simplified for clarity
override val value: T
    get() {
        if (_value !== UNINITIALIZED_VALUE) {
            return _value as T
        }

        val initializerValue = initializer
        if (initializerValue != null) {
            val newValue = initializerValue()
            // Try to atomically set the value.
            if (valueUpdater.compareAndSet(this, UNINITIALIZED_VALUE, newValue)) {
                initializer = null
                return newValue
            }
        }
        return _value as T
    }
- Mechanism: It uses a lock-free approach with an
AtomicReferenceFieldUpdater.- Multiple threads can access an uninitialized value and call the
initializerValue()lambda concurrently. They are all racing to be the first to set the value. - The
compareAndSet(CAS) operation is an atomic instruction. It will only succeed in setting_valuetonewValueif_valueis stillUNINITIALIZED_VALUE. - Only one thread will "win" this race. Its
newValuebecomes the final, published value. The other threads that also computed a value will simply discard their result and use the value that won the race.
- Multiple threads can access an uninitialized value and call the
- Use Case: This mode is useful when the initializer lambda is a cheap, idempotent operation (meaning it's safe to call multiple times) and you want to avoid the potential contention of a lock. It trades off potentially redundant computation for lock-free concurrency.
💡 Pro Tips for Mastery: How lazy() delegate property is compiled to Java Bytecode?
In Kotlin, by lazy { ... } is a pretty clever feature for performance optimization, deferring expensive computations until they are actually needed. While the syntax is clean and concise, the Kotlin compiler performs a specific and efficient transformation to implement this behavior on the JVM.
Let's start with a simple class that contains a lazy property.
class UserSession {
    val heavyUserData: String by lazy {
        println("Computing heavy user data...")
        // Simulate an expensive operation
        Thread.sleep(1000)
        "User Profile Data"
    }
}
In this code, the "Computing heavy user data..." message will only be printed the very first time heavyUserData is accessed. When this Kotlin class is compiled and then decompiled into Java, the lazy property is transformed into several distinct bytecode components.
import kotlin.Lazy;
import kotlin.LazyKt;
import kotlin.Metadata;
import kotlin.jvm.functions.Function0;
import kotlin.jvm.internal.PropertyReference0Impl;
import kotlin.reflect.KProperty;
import org.jetbrains.annotations.NotNull;

public final class UserSession {
    // 1. A private, final field to hold the Lazy instance.
    @NotNull
    private final Lazy heavyUserData$delegate;

    // 2. A static metadata field for the property.
    static final /* synthetic */ KProperty<Object>[] $$delegatedProperties =
        new KProperty[] { (KProperty) new PropertyReference0Impl(UserSession.class, "heavyUserData", "getHeavyUserData()Ljava/lang/String;") };

    // 3. The public getter method. This is the access point.
    @NotNull
    public final String getHeavyUserData() {
        return (String) this.heavyUserData$delegate.getValue(this, $$delegatedProperties[0]);
    }

    public UserSession() {
        // The Lazy instance is created in the constructor.
        this.heavyUserData$delegate = LazyKt.lazy((Function0) new Function0<String>() {
            @NotNull

            public final String invoke() {
                System.out.println("Computing heavy user data...");
                Thread.sleep(1000L);
                return "User Profile Data";
            }
        });
    }
}
Let's break down the three key components generated by the compiler:
1. The Lazy Delegate Field (heavyUserData$delegate)
The compiler does not create a field named heavyUserData to hold the String value. Instead, it creates a private, final field named after the original property but with a $delegate suffix.
The private final Lazy heavyUserData$delegate; field's type is kotlin.Lazy. Its purpose is to hold the instance of the lazy initializer object itself (e.g., a SynchronizedLazyImpl).
In the constructor (public UserSession()), you can see this field being initialized by a call to LazyKt.lazy(...). The lambda you provided ({ ... }) is compiled into an anonymous Function0 class and passed to the lazy factory function. This is where the SynchronizedLazyImpl (or other mode) is created and stored.
2. The KProperty Metadata Field ($$delegatedProperties)
This static array of KProperty objects is generated to support reflection. The static final KProperty<Object>[] $$delegatedProperties contains metadata about the delegated property, including its name ("heavyUserData"), its owner (UserSession.class), and its getter signature. This allows the getValue operator function to know which property is being accessed, which can be useful for more advanced delegation scenarios. For a simple lazy delegate, it's often just required by the getValue function's signature.
3. The Public Getter Method (getHeavyUserData)
This is the public-facing access point for your property. When you write session.heavyUserData in Kotlin, you are actually calling this getHeavyUserData() method.
public final String getHeavyUserData() {
    return (String) this.heavyUserData$delegate.getValue(this, $$delegatedProperties[0]);
}
This getter does not return a simple field. Instead, it delegates the call to the getValue operator function of the Lazy instance stored in heavyUserData$delegate. Also, as we saw before, Lazy<T>.getValue(...) is where the core logic resides. On the first call, it will execute the initializer lambda, cache the result, and return it. On all subsequent calls, it will simply return the cached result.
This is how the clever "lazy" behavior is achieved. The actual computation only happens inside the getValue call, which is only triggered the first time the getter is invoked. Again, there's no magic; it's just the Kotlin compiler doing the "more" work.
Q) 19. What are functional (SAM) interfaces?
Functional interfaces, also known as Single Abstract Method (SAM) interfaces, are interfaces that have exactly one abstract method. These interfaces are designed to represent a single operation or function, making them an essential feature for enabling functional programming constructs and simplifying the use of lambda expressions.
A functional interface can be annotated with @FunctionalInterface for clarity, although this annotation is optional. The key characteristic of a functional interface is its single abstract method, which allows you to use lambda expressions or method references instead of creating verbose implementations.
fun interface Greeter {
    fun greet(name: String): String
}

val greeter = Greeter { name -> "Hello, $name from skydoves!" }
println(greeter.greet("Kotlin")) // Output: Hello, Kotlin from skydoves!
In this example, the Greeter functional interface defines a single method greet. A lambda expression is used to provide the implementation directly when creating an instance of Greeter.
SAM Conversion
SAM (Single Abstract Method) conversion is the mechanism that allows Kotlin to treat a lambda expression as an implementation of a functional interface. This feature eliminates boilerplate code and seamlessly integrates with Java functional interfaces, such as those in the java.util.function package.
val runnable = Runnable { println("Running with SAM conversion in skydoves!") }
runnable.run() // Output: Running with SAM conversion in skydoves!
Here, the Runnable interface from Java is a functional interface, and Kotlin's SAM conversion allows you to provide a lambda expression instead of creating an explicit implementation.
Key Features of Functional Interfaces
Functional interfaces enables concise, expressive, and interoperable code in Kotlin, especially when combined with lambda expressions and SAM conversion.
- Lambda-Friendly: Functional interfaces simplify code by enabling the use of lambdas instead of verbose anonymous classes.
- Seamless Interoperability: Kotlin's SAM conversion works with both Kotlin-defined and Java-defined functional interfaces, making it easy to integrate functional programming constructs across platforms.
- Reduced Boilerplate: By using lambda expressions with functional interfaces, you can create concise, readable, and maintainable code.
Summary
Functional (SAM) interfaces represent interfaces with a single abstract method, allowing them to be implemented using lambda expressions or method references. They enhance interoperability with Java functional interfaces through SAM conversion and reduce boilerplate code, making them a useful tool for adopting functional programming paradigms in Kotlin. Whether defining custom functional interfaces or leveraging existing ones, they contribute to cleaner and more expressive code.
💡 Pro Tips for Mastery: A philosophy of SAM conversion
In the world of programming language design, features are rarely created in a vacuum. They are often born from a necessity to solve a specific problem or to smooth over friction points between different paradigms. Single Abstract Method (SAM) conversion is a prime example of such a feature. It is not merely a piece of syntactic sugar; it is the embodiment of a language's philosophy, prioritizing pragmatic interoperability and developer ergonomics over strict ideological purity.
The philosophy behind SAM conversion begins with a direct response to a historical pain point in Java. Before the introduction of lambdas in Java 8, the only way to pass a behavior a block of code to a method was by instantiating an anonymous inner class.
Consider the ubiquitous Runnable interface in Java:
// A simple Java interface with a single abstract method.
public interface Runnable {
    void run();
}
To pass a simple "print" action to a method expecting a Runnable, a developer had to write a significant amount of boilerplate code:
// Pre-Java 8 ceremony
executor.execute(new Runnable() {
    @Override
    public void run() {
        System.out.println("Task is running.");
    }
});
The developer's intent was simple: "run this line of code." However, the language's object-oriented purity required them to express this intent through the ceremony of class instantiation and method overriding. This verbosity obscured the core logic and was a common source of developer friction.
The Philosophical Bridge: A Function is an Object (and Vice Versa)
The core philosophical insight of SAM conversion is the recognition that an interface with a single abstract method is, in essence, a contract for a function signature. The Runnable interface is structurally equivalent to a function that takes no arguments and returns nothing (() -> Unit in Kotlin).
Languages that embrace functional programming, like Kotlin, treat functions as first-class citizens. They can be passed around as values. SAM conversion is the bridge that connects these two worlds. It is a pragmatic declaration by the language designer that says:
"If a developer provides a lambda that matches the signature of a single abstract method, we understand their intent. We will do the work of converting their lightweight, functional expression into the heavier, object-oriented structure that the underlying platform expects."
This philosophy prioritizes the developer's intent over the platform's ceremony.
Kotlin's Implementation: A Commitment to Interoperability
When Kotlin was designed, it was meant to be a "better Java" with 100% interoperability. This meant it had to gracefully interact with the vast ecosystem of existing Java libraries, which were built entirely around SAM interfaces like Runnable, Callable, Comparator, and countless Android listeners (OnClickListener, OnLongClickListener, etc.).
Kotlin's implementation of SAM conversion is a direct reflection of this commitment. When the Kotlin compiler sees a lambda being passed to a Java method that expects a SAM interface, it automatically and silently generates the necessary anonymous inner class in the bytecode.
// In Kotlin, the developer expresses their simple intent.
executor.execute { println("Task is running.") }

// The Kotlin compiler generates the verbose Java bytecode for them.
// Conceptually, it produces the same structure as the old Java code.
This is a profoundly pragmatic choice. Instead of forcing the developer to deal with the impedance mismatch between a modern functional language and a legacy object-oriented API, the compiler takes on that burden. It allows the Kotlin code to remain clean, idiomatic, and functional, while ensuring the generated bytecode is perfectly compatible with the Java world.
The Evolution in Java and the Continuing Relevance in Kotlin
Java 8 eventually introduced its own lambda expressions and method references, which also rely on SAM conversion (under the term "functional interfaces"). This validated the core philosophy. However, Kotlin's approach remains distinct and relevant.
In Kotlin, you can also define your own interfaces with the fun keyword to explicitly mark them as "functional interfaces." This enables SAM conversion for your own Kotlin-to-Kotlin APIs, allowing you to design APIs that can accept lambdas while still being defined by an interface.
fun interface ActionHandler {
    fun handleAction(action: String)
}

// This API can now be called with a lambda.
fun performAction(handler: ActionHandler) { /* ... */ }

performAction { action -> println("Handling: $action") }
This shows that the philosophy is not just about Java interoperability; it's about providing an idiomatic way to bridge paradigms within Kotlin itself.
Summary
The philosophy of SAM conversion is one of pragmatic empathy for the developer. It acknowledges that different programming paradigms (object-oriented and functional) often need to coexist, especially in an ecosystem as mature as the JVM's. Instead of forcing the developer to write verbose and ceremonial code to bridge this gap, SAM conversion allows the compiler to handle the translation. It prioritizes the clear expression of intent (passing a behavior) over the strict adherence to a single paradigm's implementation details (instantiating an object). By automatically converting a function literal (a lambda) into an object that satisfies an interface contract, SAM conversion serves as a vital and elegant bridge, enabling cleaner code, better readability, and seamless interoperability between the functional and object-oriented worlds.
🚀 Ready to dive deeper? Explore advanced coroutines, compiler internals, and Kotlin Multiplatform in the complete book.
Q) 36. What is the role of a Job?
In Coroutines, a Job represents a cancellable unit of work with a lifecycle. It tracks coroutine execution and allows developers to manage tasks like launching, canceling, and monitoring coroutine states. Every coroutine launched using builders like launch or async returns a Job or Deferred(implements Job) instance, enabling structured concurrency.
Here are the key features of a Job:
-
Lifecycle Management: A Job goes through different states such as
Active,Completing,Cancelled, andCompleted. Developers can check the current state using properties likeisActive,isCompleted, andisCancelled. -
Cancellation: A Job can be canceled using the
cancel()function. Cancelling a parent Job also cancels all of its child coroutines. -
Hierarchical Structure: Jobs can be part of a parent-child hierarchy where canceling the parent automatically cancels all children, ensuring structured concurrency.
-
Job Control: Developers can use methods like
join()to wait for the coroutine's completion, or register actions withinvokeOnCompletion()to execute callbacks upon completion.
Now let's see an example of Job:
import kotlinx.coroutines.*

fun main() = runBlocking {
    val job = launch {
        repeat(5) { i ->
            println("Working on task $i...")
            delay(500L)
        }
    }

    delay(1500L)
    println("Canceling job...")
    job.cancel()  // cancel the job
    job.join()    // wait until the coroutine completes
    println("Job canceled.")
}
The output will be like so:
Working on task 0...
Working on task 1...
Working on task 2...
Canceling job...
Job canceled.
Internal Mechanisms of Job
The Job interface extends CoroutineContext.Element, which is its most fundamental property.
public interface Job : CoroutineContext.Element {
    public companion object Key : CoroutineContext.Key<Job>
}
This means a Job is a piece of the coroutine's own environment. It can be stored in and retrieved from a CoroutineContext using its Key. This is what allows a new coroutine to find its parent's Job from the inherited context (parentContext[Job]) and establish a parent-child link.
The true complexity of a Job resides in its concrete implementation, JobSupport. This class implements an intricate, lock-free state machine to manage the coroutine's lifecycle. The current state is stored in a single atomic field, _state, which can hold various internal objects representing the states.
The internal documentation outlines a clear state transition diagram:
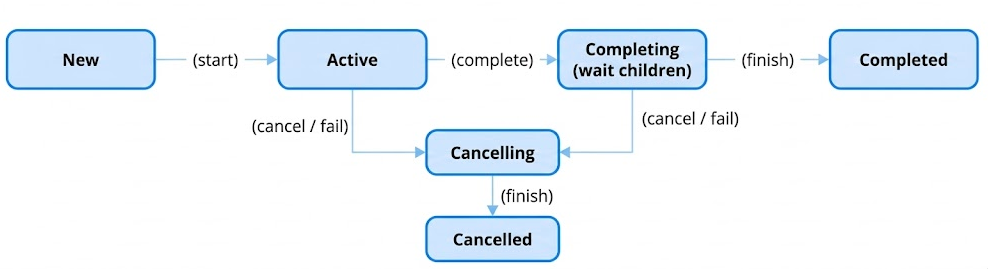
This state machine is the engine that drives structured concurrency.
New: The initial state for a lazily started coroutine. It holds a list of completion handlers but is not yet active.Active: The coroutine is running or scheduled to run. This is the default initial state.Completing: This is a pretty important state for structured concurrency. When a coroutine's own work is finished, it enters theCompletingstate. It will not transition toCompleteduntil all of its child jobs have also completed. This "waiting for children" is the core mechanism that ensures a parent scope does not finish before its children.Cancelling: A transient state entered whencancel()is called or an exception occurs. The job is now logically cancelled, and it begins cancelling all its children. It still must wait for them to finish before it can move to the finalCancelledstate.Completed/Cancelled: The final, terminal states. The job and all its children have finished their work.
This state machine is managed through a series of internal methods like tryMakeCompleting and cancelImpl, which use atomic compare-and-set operations to safely transition the _state field.
Structured Concurrency: The Parent-Child Link and Completion/Waiting
The Job interface defines the children sequence and the parent property, but the mechanism for establishing this relationship is handled within JobSupport.
When a new coroutine is created, its JobSupport instance calls initParentJob.
protected fun initParentJob(parent: Job?) {
    // ...
    val handle = parent.attachChild(this)
    parentHandle = handle
    // ...
}
parent.attachChild(this): The new job callsattachChildon its parentJob. This adds the new job to the parent's internal list of children and returns aChildHandle.parentHandle = handle: The new job stores thisChildHandle. This handle is aDisposableHandle, and it is the child's responsibility to callhandle.dispose()upon its own completion to detach itself from the parent.
This parent-child link enables two key behaviors of structured concurrency:
- Downward Cancellation: When a parent job is cancelled, it iterates through its list of children (accessible via the
childrensequence) and cancels each one. This propagates cancellation recursively down the entire job hierarchy. - Upward Failure Propagation: When a child job fails with an exception (that is not a
CancellationException), it notifies its parent via thechildCancelled(cause)method on itsChildHandle. By default, this will cause the parent to cancel itself, which in turn cancels all other sibling jobs. This ensures that a failure in one part of a concurrent system leads to a clean and predictable shutdown of the entire related scope.
On the other hand, the Job also provides mechanisms to wait for its completion (join()) and to be notified of it (invokeOnCompletion).
-
invokeOnCompletion(handler): This is the fundamental notification mechanism. Internally,JobSupportmaintains a list ofJobNodelisteners (often aNodeList). When you callinvokeOnCompletion, your handler is wrapped in aJobNodeand added to this list. When the job's state machine transitions to its finalCompletedorCancelledstate, it iterates through this list and invokes all the registered handlers. -
join(): Thejoin()suspending function is built on top ofinvokeOnCompletion. Internally,join()usessuspendCancellableCoroutineto get aContinuationthat can be resumed. It then registers aResumeOnCompletionhandler withinvokeOnCompletion. This handler's only job is to callcont.resume(Unit)when the job completes. This is howjoin()is able to suspend the calling coroutine and then resume it only after the job it's waiting on has reached its final state.
private suspend fun joinSuspend() = suspendCancellableCoroutine<Unit> { cont ->
  cont.disposeOnCancellation(invokeOnCompletion(handler = ResumeOnCompletion(cont)))
}
Summary
A Job in Coroutines is a core abstraction for managing tasks, enabling developers to handle coroutine lifecycle, cancellation, and structured task management. Understanding how Jobs work is essential for building scalable, responsive, and well-structured asynchronous applications.
💡 Pro Tips for Mastery: What's a SupervisorJob?
A SupervisorJob in Kotlin Coroutines is a specialized version of a Job that manages child coroutines independently. Unlike a regular Job, where failure in a child coroutine cancels all siblings and the parent, a SupervisorJob ensures that child coroutines operate independently, meaning the failure of one child doesn't affect the others.
Here are the key features of SupervisorJob:
-
Independent Failure Handling: Each child coroutine operates independently, meaning an exception in one child does not cancel its siblings or the parent job. This is useful in scenarios where you want tasks to be resilient to individual failures.
-
Parent-Child Relationship: The parent coroutine is still responsible for managing its children. If the parent
SupervisorJobis canceled, all its children are also canceled. -
Common Use Case:
SupervisorJobis commonly used in AndroidViewModelScopeto ensure that one failed network request or database operation doesn't affect unrelated tasks.
Let's see an example of SupervisorJob:
import kotlinx.coroutines.*

fun main() = runBlocking {
    val supervisor = SupervisorJob()

    val scope = CoroutineScope(Dispatchers.Default + supervisor)

    val firstChild = scope.launch {
        println("First child started")
        delay(1000L)
        throw RuntimeException("Error in first child")
    }

    val secondChild = scope.launch {
        println("Second child started")
        try {
            delay(2000L)
            println("Second child completed successfully")
        } catch (e: Exception) {
            println("Second child was canceled")
        }
    }

    firstChild.join()
    secondChild.join()
    println("Supervisor scope completed")
}
The expected output will be like so:
First child started
Second child started
Exception in thread "DefaultDispatcher-worker-1" java.lang.RuntimeException: Error in first child
Second child completed successfully
Supervisor scope completed
How is it possible? The first child throws a RuntimeException, causing its failure. Since the parent uses SupervisorJob, the second child continues its work and completes successfully. If the parent job was a regular Job, the second child would have been canceled automatically.
When to Use a SupervisorJob
So these are the typical scenarios you can leverage SupervisorJob over a regular Job:
- Independent Tasks: When you want tasks to be managed independently and not canceled due to sibling failures.
- UI Components: Like the
viewModelScopein Android or any task manager where partial failures are acceptable. - Background Services: For long-running services where one failed operation shouldn't terminate the entire process.
Real-world Use Case
A great example of using SupervisorJob related to the UI components is the viewModelScope on Android, which is automatically canceled when the ViewModel is cleared. Consider a scenario where you need to fetch user information by making multiple network requests while launching several asynchronous tasks. If one of the tasks throws an exception and gets canceled, the other tasks will continue running independently. This behavior occurs because viewModelScope is created with a SupervisorJob, as demonstrated in the AOSP code snippet below:
// The [CoroutineScope] associated with this [ViewModel].
public val ViewModel.viewModelScope: CoroutineScope
    get() =
        synchronized(VIEW_MODEL_SCOPE_LOCK) {
            getCloseable(VIEW_MODEL_SCOPE_KEY)
                ?: createViewModelScope().also { scope ->
                    addCloseable(VIEW_MODEL_SCOPE_KEY, scope)
                }
        }

internal fun createViewModelScope(): CloseableCoroutineScope {
    val dispatcher =
        try {
            // In platforms where Dispatchers.Main is not available, Kotlin Multiplatform will
            // throw an exception (the specific exception type may depend on the platform). Since there's
            // no direct functional alternative, we use EmptyCoroutineContext to ensure that a
            // coroutine launched within this scope will run in the same context as the caller.
            Dispatchers.Main.immediate
        } catch (_: NotImplementedError) {
            // In Native environments where Dispatchers.Main might not exist (e.g., Linux):
            EmptyCoroutineContext
        } catch (_: IllegalStateException) {
            // In JVM Desktop environments where Dispatchers.Main might not exist (e.g., Swing):
            EmptyCoroutineContext
        }
    // [SupervisorJob]: ensures children jobs can fail independently of each other.
    return CloseableCoroutineScope(coroutineContext = dispatcher + SupervisorJob())
}
In the return statement from the AOSP code above, you can see that a CloseableCoroutineScope is created with a SupervisorJob. This setup ensures that the entire scope is not canceled if one of its child coroutines throws an exception. Instead, only the failing child is affected, allowing other coroutines within the same scope to continue running independently.
Internals of SupervisorJob
The public API of SupervisorJob(parent) function is a pretty simple factory that instantiates a private implementation class, SupervisorJobImpl.
public fun SupervisorJob(parent: Job? = null) : CompletableJob = SupervisorJobImpl(parent)

private class SupervisorJobImpl(parent: Job?) : JobImpl(parent) {
    override fun childCancelled(cause: Throwable): Boolean = false
}
The entire implementation of SupervisorJobImpl is a single-line override. To understand its internals, we must first understand what it is overriding.
A standard Job, created via Job(), is an instance of JobImpl, which inherits its behavior from JobSupport. In JobSupport, when a child coroutine fails, it eventually calls childCancelled(cause) on its parent's ChildHandle. The default implementation of this method in a standard Job is designed to propagate the failure upwards:
// In a regular JobSupport instance
public open fun childCancelled(cause: Throwable): Boolean {
    // A CancellationException is considered normal, don't cancel the parent.
    if (cause is CancellationException) return true

    // For any other exception, cancel the parent itself.
    return cancelImpl(cause)
}
This is the mechanism of failure propagation. A non-cancellation exception from a child causes the parent to cancel itself.
The SupervisorJobImpl overrides this just a single statement below:
override fun childCancelled(cause: Throwable): Boolean = false
- The Override: By always returning
false, theSupervisorJobis telling the coroutine machinery: "A child has notified me of its failure, but I have not handled the exception, and I will not be cancelling myself because of it." - The Effect: This effectively breaks the upward propagation of failure. The child's failure is contained. The supervisor job remains active, and its other children continue to run unaffected. The responsibility for handling the failed child's exception is now delegated elsewhere, typically to a
CoroutineExceptionHandlerin the child's context or by the consumer of anasyncDeferredresult.
This small but profound change is the entire internal mechanism that defines a SupervisorJob. It is a surgical modification of the default structured concurrency behavior to provide fault isolation.
On the other hand, the supervisorScope function provides a convenient way to create an ad-hoc supervisory scope. Its internal mechanism is to create a temporary, specialized coroutine, SupervisorCoroutine, which acts as the root of the new scope.
public suspend fun <R> supervisorScope(block: suspend CoroutineScope.() -> R): R {
    // ...
    val coroutine = SupervisorCoroutine(uCont.context, uCont)
    // ...
}

private class SupervisorCoroutine<in T>(...) : ScopeCoroutine<T>(...) {
    override fun childCancelled(cause: Throwable): Boolean = false
}
Just like SupervisorJobImpl, the SupervisorCoroutine is a specialized coroutine whose only unique feature is that it overrides childCancelled to return false. When you launch new coroutines inside a supervisorScope block, their parent Job will be this SupervisorCoroutine. Therefore, any failures in those children will be stopped at the SupervisorCoroutine, preventing the failure from leaking out and cancelling the outer scope that called supervisorScope.
Summary
A SupervisorJob ensures fault-tolerance by isolating failures in child coroutines. It supports building resilient coroutine-based applications where specific tasks can fail without affecting unrelated operations. Understanding its use is essential for creating robust and scalable asynchronous systems in Kotlin.
Q) 43. Explain the differences between StateFlow and SharedFlow
Both StateFlow and SharedFlow are hot flows designed for sharing data streams across multiple subscribers. However, they differ in their behavior, use cases, and how they handle data.
StateFlow
StateFlow is a specialized type of flow that always holds a single value, known as the state. It emits the latest value to any new collector as soon as they subscribe, ensuring they always receive the most current state. This makes it an ideal choice for scenarios where maintaining and sharing the latest state is essential, such as UI state management.
StateFlow requires an initial value during its creation. Any updates to the state are immediately reflected in the flow, and subscribers are notified of the change. A practical case for using StateFlow is when managing the state of a screen, like tracking a user's input or the current screen's loading status.
val stateFlow = MutableStateFlow("Initial State")
stateFlow.value = "Updated State"
stateFlow.collect { println("Collector received: $it") }
Here, subscribers will always observe the most recent value stored in the flow. Looking closely, a StateFlow is essentially a specialized type of SharedFlow:
public interface StateFlow<out T> : SharedFlow<T> {
    /**
     * The current value of this state flow.
     */
    public val value: T
}
Internally, StateFlow is a specialized, high-performance implementation of SharedFlow designed for managing and sharing state. It always holds an initial value, replays the most recent value to new subscribers, and does not buffer additional values beyond the last emitted one. Unlike MutableSharedFlow, StateFlow does not support resetting its replay cache with resetReplayCache().
A StateFlow behaves like a SharedFlow configured with the following parameters and using the distinctUntilChanged operator:
// MutableStateFlow(initialValue) as a SharedFlow equivalent:
val shared = MutableSharedFlow<Int>(
    replay = 1,
    onBufferOverflow = BufferOverflow.DROP_OLDEST
)
shared.tryEmit(initialValue) // Emit the initial value
val state = shared.distinctUntilChanged() // Achieve StateFlow-like behavior
SharedFlow
SharedFlow is a more versatile hot flow that supports multiple collectors and can replay a specified number of previously emitted values to new subscribers. Unlike StateFlow, it does not hold a single persistent value but instead broadcasts updates to all active subscribers.
SharedFlow is perfect for events or streams of data where replaying past emissions or handling multiple simultaneous subscribers is required. Examples include notifications, UI events, or messages in a chat application.
By configuring the replay parameter, SharedFlow can ensure new subscribers see recent events while avoiding the need to replay the entire history.
val sharedFlow = MutableSharedFlow<String>(replay = 1)
sharedFlow.emit("Event 1")
sharedFlow.emit("Event 2")
sharedFlow.collect { println("Collector received: $it") }
In this case, the collector observes the most recent events or those configured for replay.
Key Differences Between StateFlow and SharedFlow
The fundamental difference lies in their use cases and behavior. StateFlow is designed for holding and sharing the latest state, ensuring every subscriber is immediately updated with the current value. SharedFlow, on the other hand, is suited for broadcasting events or streams, with flexibility in replaying values to new subscribers.
StateFlow always holds a value and requires an initial state, making it more restrictive but reliable for state management. SharedFlow provides greater flexibility without maintaining a persistent state, making it ideal for event-driven scenarios.
Summary
StateFlow and SharedFlow cater to different needs in reactive programming. Use StateFlow when you need a flow to always represent the latest state, ensuring every subscriber starts with the current value. Choose SharedFlow for more dynamic scenarios involving event streams, broadcasting updates, and sharing data among multiple subscribers with replay capabilities.
💡 Pro Tips for Mastery: Internal Mechanisms of StateFlow
While the public API of StateFlow is simple—a value property and a collect function—its internal mechanism is a well organized, lock-free (in parts) and synchronized system. It is engineered to provide strong thread-safety, efficient conflation, and minimal allocation overhead, making it a high-performance primitive for state management.
The internal documentation of StateFlow explicitly states that StateFlow is a specialized implementation of SharedFlow. It behaves like a SharedFlow created with replay = 1 and onBufferOverflow = BufferOverflow.DROP_OLDEST. This means it always has a value, it replays the most recent value to new collectors, and any new value updates will overwrite the previous one if collectors are too slow (conflation). The core implementation resides in the private StateFlowImpl class.
The State-Holding Mechanism
The heart of StateFlowImpl is a single atomic reference that holds the current state.
private val _state = atomic(initialState) // T | NULL
private var sequence = 0 // serializes updates
It's very simple but important. Let's see what it does:
_state: Anatomicreference (fromkotlinx-atomicfu) that holds the current value. It is initialized with theinitialState. This atomic reference is the source of truth for thevalueproperty and is what provides the fundamental thread-safety for reads.sequence: This integer is a clever and important part of the update mechanism. It acts as a version number or a lock-free state indicator for updates.- An even sequence number means the
StateFlowis in a "quiescent" state (no update is in progress). - An odd sequence number means an update is currently in progress, and collectors are being notified.
- An even sequence number means the
The Update Mechanism: updateState() and Synchronization
The magic of StateFlow's thread-safe updates lies in the updateState function, which is called by the value setter and compareAndSet.
private fun updateState(expectedState: Any?, newState: Any): Boolean {
    var curSequence: Int
    var curSlots: Array<StateFlowSlot?>?
    synchronized(this) { // 1. The synchronized lock
        val oldState = _state.value
        if (expectedState != null && oldState != expectedState) return false // CAS support
        if (oldState == newState) return true // Conflation via equality check
        _state.value = newState // 2. Update the atomic value

        curSequence = sequence
        if (curSequence and 1 == 0) { // 3. Is it quiescent (even)?
            curSequence++ // Make it odd to signal an update is starting
            sequence = curSequence
        } else {
            // 4. Update is already in process.
            sequence = curSequence + 2 // Just bump the sequence and return
            return true
        }
        curSlots = slots // Get the list of collectors
    }

    // 5. Notify collectors outside the lock
    while (true) {
        curSlots?.forEach { it?.makePending() }
        synchronized(this) {
            if (sequence == curSequence) { // 6. Check if another update happened
                sequence = curSequence + 1 // Make it even again
                return true
            }
            // 7. Another update raced us, loop again to notify for the new value
            curSequence = sequence
            curSlots = slots
        }
    }
}
It looks pretty complicated, but let's break it down step by step:
- The
synchronizedBlock: All state writes are protected by asynchronized(this)lock. This guarantees that only one thread can modify the_stateandsequenceat a time, ensuring atomicity. - State Update and Conflation: Inside the lock, it first checks for equality (
oldState == newState). If the new value is the same as the old one, it does nothing and returnstrue. This is equality-based conflation. If the value is different, it updates the atomic_statereference. - Initiating an Update: If the
sequencenumber is even, it means this is a new update. The number is incremented to become odd, signaling that a notification process has begun. - Coalescing Concurrent Updates: If the
sequenceis already odd, it means another thread is currently in the process of notifying collectors. This thread doesn't need to do anything more. It simply bumps thesequencenumber again (e.g., from 3 to 5). This signals to the thread that is already in the notification loop that a new value has arrived and it needs to run its notification loop at least one more time. - Notification Outside the Lock: The most critical performance and safety feature is that the notification of collectors happens outside the
synchronizedblock. It iterates through the collector slots and callsmakePending(), which will resume any suspended collectors. This prevents deadlocks, especially with unconfined dispatchers, where a resumed collector might try to acquire the same lock. - The "Flat Combining" Loop: The
while (true)loop is a form of flat combining. After notifying collectors, the thread re-acquires the lock and checks if thesequencenumber has changed again. If it has, it means another thread updated thevaluewhile this thread was busy notifying. So, it re-reads the collectors and loops again to ensure everyone gets the latest value. If the sequence number hasn't changed, it means no new updates came in, so it can safely increment the sequence to an even number and finish.
The Collection Mechanism: collect() and StateFlowSlot()
On the other hand, the collect() implementation is designed to be highly efficient and responsive. Each collector is allocated a StateFlowSlot.
private class StateFlowSlot : AbstractSharedFlowSlot<StateFlowImpl<*>>() {
    private val _state = atomic<Any?>(null) // Can be null, NONE, PENDING, or a Continuation
    // ...
}
The StateFlowSlot is a small state machine for each individual collector. It tracks whether the collector is idle (NONE), has a new value to process (PENDING), or is suspended waiting for a new value (a CancellableContinuationImpl).
The collect loop works as follows:
while (true) {
    val newState = _state.value
    // ... check for cancellation ...

    // 1. Emit if the value is new
    if (oldState == null || oldState != newState) {
        collector.emit(NULL.unbox(newState))
        oldState = newState
    }

    // 2. Check for pending updates and suspend if needed
    if (!slot.takePending()) { // Fast path: Is a new value already pending?
        slot.awaitPending()   // Slow path: Suspend until a new value arrives
    }
}
- Emit the Current Value First: A new collector always receives the most recent value immediately. The loop then compares the
newStateto theoldStateit last emitted. If they are different, it emits the new value. This is the client-side implementation ofdistinctUntilChanged. - Suspend Efficiently: After emitting, it checks its
slot. ThetakePending()call is a fast-path check to see if an update occurred while it was emitting. If not, it callsawaitPending(), which is asuspendCancellableCoroutinethat suspends the collector. When theupdateStatemethod callsmakePending()on this slot, this suspended coroutine is resumed, and thewhileloop continues, ensuring the collector always processes the latest state.
Summary
The internal mechanism of StateFlow is a well optimized and thread-safe system for managing a single piece of observable state.
- It is built upon an atomic reference for the current value and a
synchronizedblock to manage all writes, ensuring thread safety. - A clever sequence number system is used to serialize updates and coalesce concurrent writes, a pattern known as "flat combining."
- The notification of collectors happens outside of the main lock to prevent deadlocks and improve concurrency.
- The collection process is also well optimized, ensuring each collector receives the current value immediately and then suspends efficiently using a slot-based state machine, only waking up when a new, distinct value is available.
💡 Pro Tips for Mastery: Internal Mechanisms of SharedFlow
SharedFlow's internal implementation, SharedFlowImpl, reveals a complex, well synchronized, and state-driven system. It is essentially a custom, lock-based implementation of a concurrent circular buffer combined with queues of suspended coroutines (both emitters and collectors) to manage backpressure and state.
The Core Data Structure: A Circular Buffer and Indices
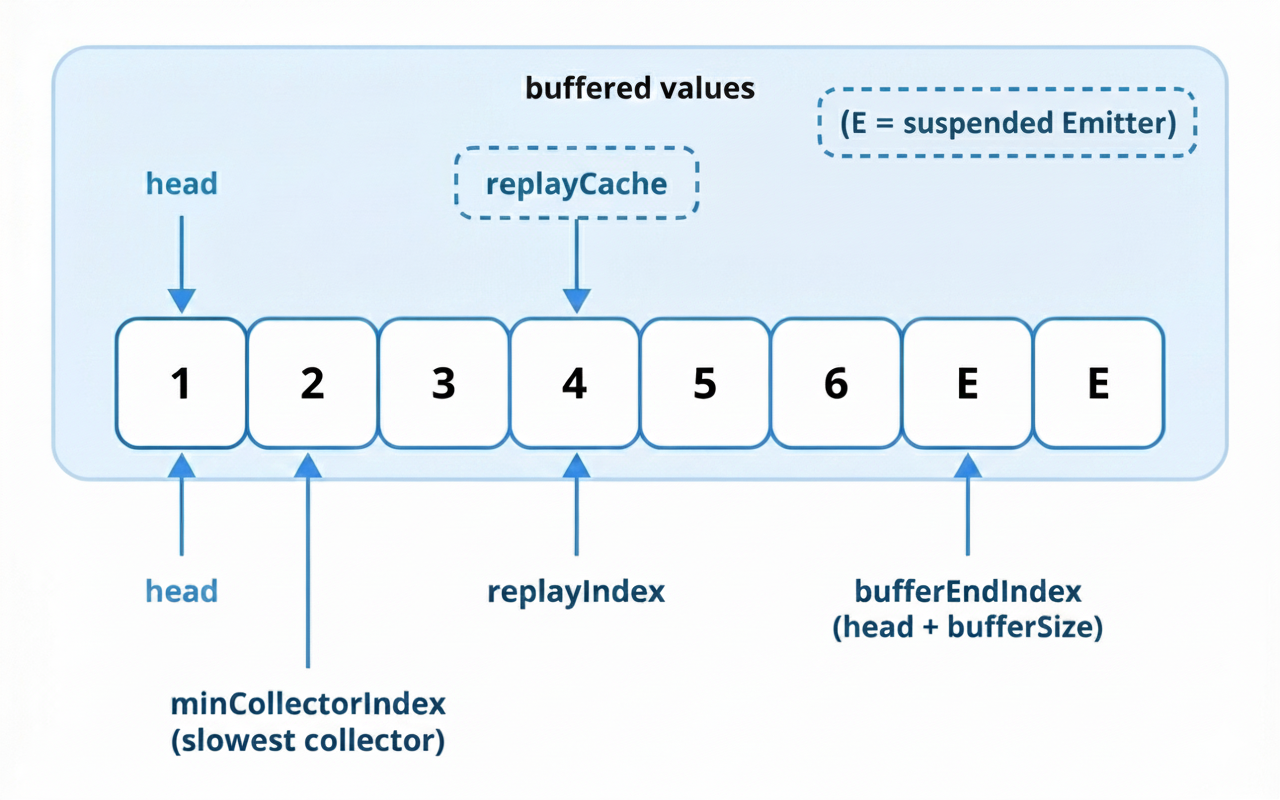
The heart of SharedFlowImpl's state is not a simple list. It's a dynamically resizing circular buffer (private var buffer: Array<Any?>?) managed by a set of important index pointers:
replayIndex: The starting index from which a new subscriber will begin receiving values. It points to the first element in the replay cache.minCollectorIndex: The index of the slowest active collector. This is a crucial pointer for managing backpressure. No data can be dropped from the buffer before this index.bufferSize: The number of actual values currently stored in the buffer.queueSize: The number of suspended emitters waiting to place a value into the buffer.
The logical structure of the buffer is a contiguous sequence in memory, but it's treated as a circular array to allow for efficient addition and removal of elements from both ends.
The emit Mechanism: A Synchronized State Update
The emit and tryEmit functions are the entry points for producers. All emission logic is coordinated through a synchronized(this) block to ensure thread safety.
// 1. Fast path for no collectors
if (nCollectors == 0) return tryEmitNoCollectorsLocked(value)

// 2. Check for backpressure
if (bufferSize >= bufferCapacity && minCollectorIndex <= replayIndex) {
    when (onBufferOverflow) {
        BufferOverflow.SUSPEND -> return false // Signal to suspend
        BufferOverflow.DROP_LATEST -> return true // Ignore the new value
        BufferOverflow.DROP_OLDEST -> {} // Proceed to drop the oldest
    }
}
// 3. Enqueue the value and update state
enqueueLocked(value)
bufferSize++
if (bufferSize > bufferCapacity) dropOldestLocked()
// ... manage replay cache size ...
return true
- No Collectors Fast Path: If there are no active subscribers,
emitis very fast. It simply adds the new value to the replay cache (ifreplay > 0) and drops the oldest if the cache is full. No buffering or suspension logic is needed. - Backpressure Check: If there are collectors, it checks if the buffer is full and if the slowest collector is lagging behind. If both are true, it respects the
onBufferOverflowpolicy. For the defaultSUSPENDpolicy,tryEmitLockedreturnsfalse, signaling that theemitcall must suspend. - Enqueue and Update: If there is space, the value is added to the buffer. The
bufferSizeis incremented. If this exceeds thebufferCapacity, thedropOldestLockedfunction is called, which nulls out the oldest element and advances theheadandminCollectorIndexpointers.
If emit needs to suspend, the emitSuspend function is called. It wraps the current coroutine's Continuation into a special Emitter object and places this object at the end of the buffer queue. The coroutine is then suspended. It will be resumed later by a collector that makes space in the buffer.
The collect Mechanism: The Subscriber's State Machine
The collect method is where a consumer interacts with the SharedFlow. Each collector is allocated a SharedFlowSlot to track its progress.
internal class SharedFlowSlot {
    @JvmField var index = -1L // The index of the next value this collector expects.
    @JvmField var cont: Continuation<Unit>? = null // The suspended continuation of the collector.
}
The collect loop is an intricate dance of trying to get a value without suspending, and suspending only when necessary.
while (true) {
    var newValue: Any?
    while (true) {
        // 1. Fast Path: Try to take a value without suspending.
        newValue = tryTakeValue(slot)
        if (newValue !== NO_VALUE) break

        // 2. Slow Path: Suspend and wait for a new value.
        awaitValue(slot)
    }
    // ... check for cancellation and emit ...
}
Let's look into the primary two behaviors from the above code:
-
tryTakeValue(slot): This is the fast path. It enters asynchronizedblock and checks if the value at the collector's currentslot.indexis available in the buffer. If it is, it retrieves the value, updates theslot.indexto point to the next element, and returns the value. A key part of this function isupdateCollectorIndexLocked, which is called after a collector advances. This function checks if the slowest collector has moved forward, and if so, it can free up space in the buffer and potentially resume suspended emitters. -
awaitValue(slot): IftryTakeValuefails (meaning no new value is available), the collector must suspend. TheawaitValuefunction is asuspendCancellableCoroutine. It enters asynchronizedblock, stores the coroutine'sContinuationinslot.cont, and then suspends.
When a producer emits a new value, the tryEmitLocked function calls findSlotsToResumeLocked. This function iterates through all the slots, finds any that have a suspended continuation (cont != null), and resumes them. This is how a suspended collector is "woken up" to process the new value.
Summary
The internal mechanism of SharedFlow is a well concurrent and optimized system for broadcasting values.
- It is built around a central, thread-safe state managed by a
synchronizedlock, which includes a circular array buffer and a set of critical index pointers (replayIndex,minCollectorIndex). - The
emitoperation is a synchronized state update. It checks for backpressure against the slowest collector and either enqueues the new value, drops an old one, or suspends the emitter by placing itsContinuationin a queue. - The
collectoperation is an efficient loop for each subscriber. It first attempts a fast, non-suspending path to read from the buffer. If no new data is available, it enters a slow path, suspending the collector by storing itsContinuationin its dedicatedSharedFlowSlot. - The system is connected by the resumption mechanism: a successful
emitwill find and resume any suspended collectors, and a successfulcollectwill free up buffer space and resume any suspended emitters.
Q) 56. What is the K2 compiler?
The K2 Compiler is the next-generation Kotlin compiler frontend introduced by JetBrains, representing a complete architectural redesign of how Kotlin code is analyzed and processed. First stabilized in Kotlin 2.0 (May 2024), K2 brings significant improvements in compilation speed, code analysis accuracy, and extensibility.
Why K2?
The original Kotlin compiler (sometimes called "K1" or "the old compiler") served Kotlin well for many years but had accumulated technical debt and architectural limitations. Performance bottlenecks in the K1 frontend's design made certain optimizations difficult. Years of feature additions made the codebase complex and harder to maintain. Sharing code between the compiler and IDE was problematic, leading to duplicated effort. Adding new features required extensive changes across the codebase, limiting extensibility.
K2 addresses these issues with a ground-up rewrite based on lessons learned from a decade of Kotlin compiler development. The new architecture is designed from the start for better performance, clearer separation of concerns, and easier extensibility.
Key Improvements
Significantly Faster Compilation
K2 delivers substantial performance improvements across different scenarios:
| Scenario | K1 | K2 | Improvement |
|---|---|---|---|
| Clean build (large project) | 100s | 55-70s | ~30-45% faster |
| Incremental build | 15s | 8-10s | ~35-50% faster |
| Type checking | Baseline | 2x faster | Analysis phase |
| IDE responsiveness | Baseline | Noticeably better | Code completion, highlighting |
These improvements come from K2's new architecture that enables better parallelization and more efficient data structures.
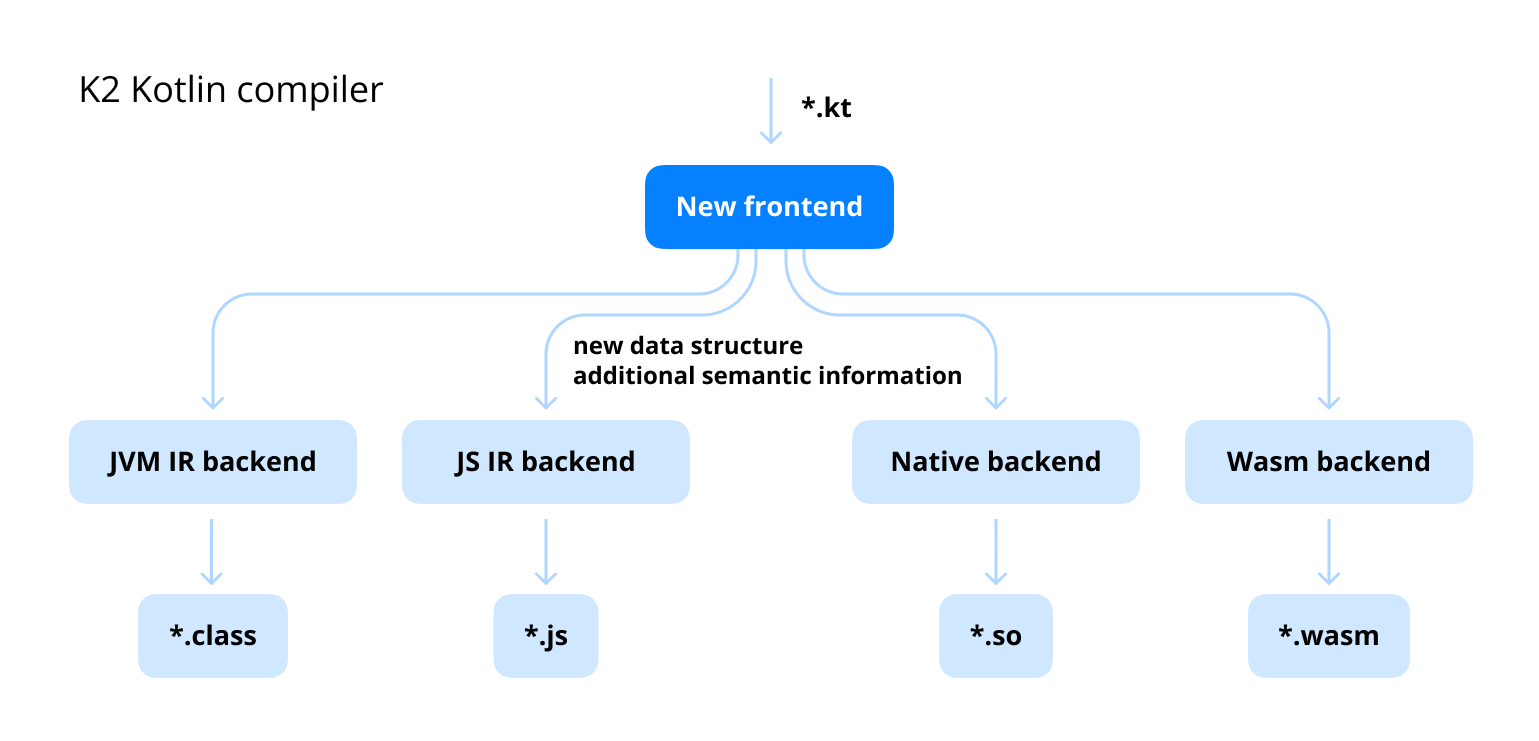
Unified Analysis Architecture
One of K2's most important architectural changes is the introduction of FIR (Frontend Intermediate Representation). Unlike K1's interleaved analysis, FIR provides a clear, phased approach:
Better Error Messages and Diagnostics
K2's phased architecture enables more precise error reporting:
// K1 Error
Type mismatch: inferred type is String? but String was expected

// K2 Error
Type mismatch: inferred type is 'String?' but 'String' was expected.
  - The receiver 'map["key"]' can be null because 'Map.get' returns 'V?'
  - Consider using 'map.getValue("key")' or adding a null check
Improved Language Feature Support
K2 provides better support for complex language features. Smart casts work in more scenarios where the compiler can infer types. Generic type argument inference handles complex cases better. Context receivers have a cleaner implementation. The architecture is designed to accommodate upcoming language changes more easily.
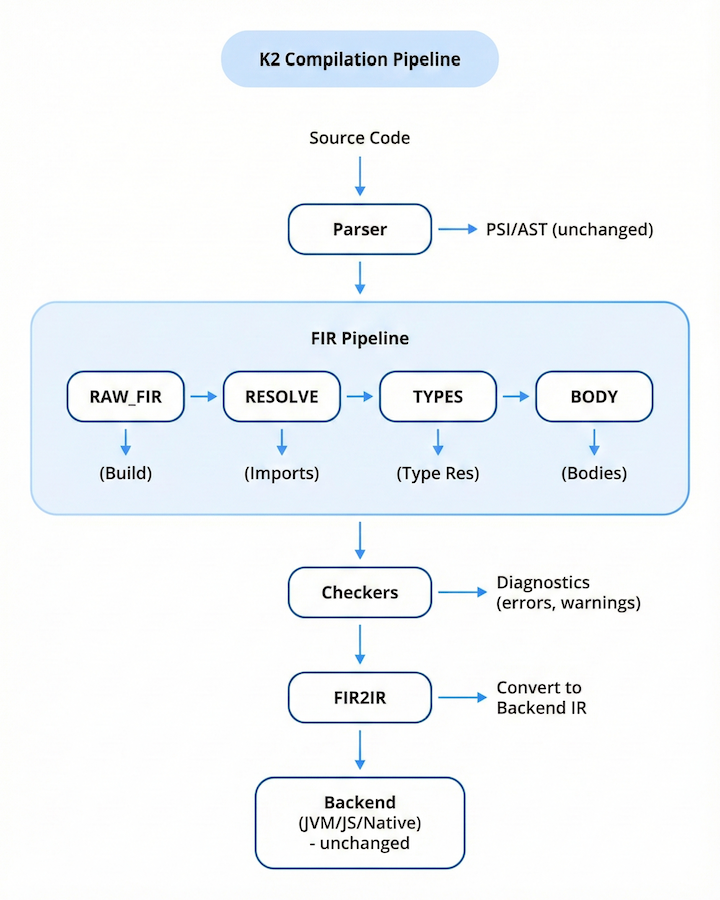
FIR Compilation Phases
FIR processes code through well-defined phases, each with specific guarantees:
| Phase | Purpose | Guarantees After Phase |
|---|---|---|
| RAW_FIR | Build initial FIR tree from AST | Syntactic structure established |
| IMPORTS | Resolve import statements | Imports split into components |
| SUPER_TYPES | Resolve class hierarchies | Supertype relationships known |
| TYPES | Resolve explicit type references | Declared types resolved |
| STATUS | Resolve modifiers (visibility, modality) | Modifiers finalized |
| BODY_RESOLVE | Resolve function/property bodies | Full type inference complete |
| CHECKERS | Run diagnostic checkers | All errors/warnings generated |
This phased approach ensures that when analyzing code at phase N, all elements from phases 1 through N-1 are fully resolved.
K2 for Plugin Authors
K2 introduces new extension points through the FIR API, making it easier to write compiler plugins:
class MyFirExtensionRegistrar : FirExtensionRegistrar() {
    override fun ExtensionRegistrarContext.configurePlugin() {
        // Register declaration generation (new methods/properties)
        +::MyDeclarationGenerationExtension

        // Register supertype generation (add interfaces)
        +::MySupertypeGenerationExtension

        // Register custom checkers (diagnostics)
        +::MyAdditionalCheckersExtension
    }
}

class MyDeclarationGenerationExtension(
    session: FirSession
) : FirDeclarationGenerationExtension(session) {

    override fun generateFunctions(
        callableId: CallableId,
        context: MemberGenerationContext?
    ): List<FirNamedFunctionSymbol> {
        // Generate synthetic functions based on annotations
        return listOf(createMyGeneratedFunction(callableId))
    }
}
Migration to K2
Enabling K2 in your project is straightforward:
# gradle.properties
# Enable K2 compiler
kotlin.experimental.tryK2=true

# Or for Kotlin 2.0+
kotlin.compilerVersion=2.0.0
// build.gradle.kts
kotlin {
    compilerOptions {
        // K2 is default in Kotlin 2.0
        // For 1.9.x, enable explicitly:
        freeCompilerArgs.add("-Xuse-k2")
    }
}
Compatibility Considerations
While K2 is designed to be compatible with existing code, there are some edge cases to be aware of:
| Area | K1 Behavior | K2 Behavior |
|---|---|---|
| Smart casts | Conservative | More aggressive (may reveal hidden issues) |
| Type inference | Older algorithm | Improved algorithm (rarely different results) |
| Deprecation warnings | May be missing | More complete checking |
| Plugin API | Old extensions | New FIR extensions required |
Most projects can migrate to K2 without code changes, but thorough testing is recommended.
Summary
The K2 compiler represents the most significant evolution of the Kotlin compiler since its inception. With its FIR-based architecture, K2 delivers faster compilation times, better error messages, improved IDE integration, and a more maintainable codebase for future development. For Kotlin developers, this means shorter build times and better tooling. For plugin authors, it provides cleaner extension points and more powerful code generation capabilities. K2 is now stable as of Kotlin 2.0 and is the recommended compiler for all new projects. For detailed migration guidance, see the K2 compiler migration guide.
Note: This is a preview of Practical Kotlin Deep Dive, featuring a curated selection of topics from the book. To explore the full content, please visit the main page. You can directly read the full content on Leanpub and Gumroad.
Ready to master Kotlin?
Get the complete book with all chapters and deep dives into Kotlin internals.